Execution Cycle of C#.Net Application
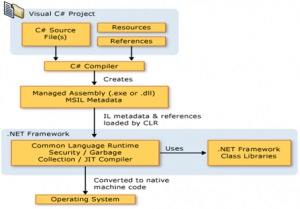
C# programs run on the .NET Framework, an integral component of Windows that includes a virtual execution system called the common language runtime (CLR) and a unified set of class libraries. The CLR is the commercial implementation by Microsoft of the common language infrastructure (CLI), an international standard that is the basis for creating execution and development environments in which languages and libraries work together seamlessly.

- Source code written in C# is compiled into an intermediate language (IL) that conforms to the CLI specification.
- The IL code and resources, such as bitmaps and strings, are stored on disk in an executable file called an assembly, typically with an extension of .exe or .dll.
- An assembly contains a manifest that provides information about the assembly's types, version, culture, and security requirements.
- When the C# program is executed, the assembly is loaded into the CLR, which might take various actions based on the information in the manifest.
- Then, if the security requirements are met, the CLR performs just in time (JIT) compilation to convert the IL code to native machine instructions.
- The CLR also provides other services related to automatic garbage collection, exception handling, and resource management.
- Code that is executed by the CLR is sometimes referred to as "managed code," in contrast to "unmanaged code" which is compiled into native machine language that targets a specific system.
- The following diagram illustrates the compile-time and run-time relationships of C# source code files, the .NET Framework class libraries, assemblies, and the CLR.
Language interoperability is a key feature of the .NET Framework. Because the IL code produced by the C# compiler conforms to the Common Type Specification (CTS), IL code generated from C# can interact with code that was generated from the .NET versions of Visual Basic, Visual C++, or any of more than 20 other CTS-compliant languages. A single assembly may contain multiple modules written in different .NET languages, and the types can reference each other just as if they were written in the same language.
Different Types of Applications
The three main types of application that can be written in C# are.
- Win forms – Windows like Forms. (Windows Based)
- Console – Command line Input and Output. (Windows Based)
- Web Sites. (Web Application)
Windows-based applications created by using .NET Framework classes offer other benefits. You can access operating-system services and take advantage of other benefits provided by your user's computing environment. You can access data by using ADO.NET. For more information, see Creating Data Applications with Visual Studio. GDI+ enables you to do advanced drawing and painting in your windows forms applications. For more information, see Graphics and Drawing in Windows Forms. Your Windows-based applications can make calls to methods exposed through XML Web services, so you can take advantage of information and computing resources from a variety of sources and partners.
Win forms:
Over the last 12 or 13 years as both C++ and Java increased their popularity there was a sense of dissatisfaction regarding GUI development. Java GUIs (Swing, AWT) inevitably suffered from poor performance; they were adequate but not great.
So C# has the advantage- a single platform to work on (plus the independently developed Project Mono in the Linux world). There are many places that run mixed language applications with Delphi/VB on the front end and C++ or Java on the back. Also there are mixed platforms, Windows on the front and Linux on the Unix networked server. With C# you can replace both client and server.
How to Develop a Windows Application Or Win form?
- Create a New Project in Visual C#
- Then select Visual C# Project
- Then Windows Application
- Select a path to put it somewhere
- Then give it a name like ex1 and click ok
You should see something like this picture

You can now resize this form by clicking and dragging the right or bottom handles. Now click on Button in the toolbox and drag it onto the form in the bottom right hand corner. Resize it as you wish. Now in the bottom right of the Visual C#/Visual Studio IDE you should see a docked Window called Properties. If you can't see it, right-click the button on the form (it will say button1) and click properties at the bottom of the pop-up menu that appears. This like most windows has a push-pin on it so you can close or keep it open as you wish.
Microsoft has supplied its default libraries under the System.Windows.Forms namespace in beta2 (It was System.WinForms namespace in beta1). The assembly being System.dll and System.Windows.Forms.dll.
This namespace has a class called Form, which all our Win Forms should extend. The Form class creates the basic form container which will host our controls like Textboxes, List Boxes etc.
To produce Windows Applications, the C# CSC compiler has a '/t:WinExe' (/target:WinExe) option.
First WinForm:
Let's kick some code! Fire up any editor (like notepad), copy the code given below and save the file as "filename.cs". Once the file is saved, start Ms-Dos Command and navigate to the directory where you have saved the file and fire the compiler command. If your code is proper you should have a filename.exe generated in the same folder. Run this file to view your WinForm.
/* Compile: csc /t:WinExe /:System.dll Form1.cs */
using System ;
//Import the WinForms Namespace
using System.Windows.Forms ;
//Class Form1 extends class Form from the
//System.Windows.Forms namespace
public class Form1 : Form
{
//Main Method
public static void Main( )
{
//Run the Application
Application.Run(new Form1());
}
}
The above code is all that you need to create your first WinForm!! On close examination of the above code you will find that I have first added a 'using System.Windows.Forms' directive to import the WinForm Namespace. Next our Form1 class is declared, which extends/inherits the Form class. In the Main method you will find one different statement.
As I have discussed earlier while creating WinForms we are actually creating Windows Applications, in order to run such applications we have to use the static 'Run' method from the 'Application' class which also resides in the System.Windows.Forms namespace. The Application class is a sealed class (so you cannot inherit it) which takes care of running and exiting windows applications. It is also helpful to process Windows messages. The 'Run' method takes one parameter, the instance of the Application to run.
On running the above code you should see a WinForm like this.

The above code creates a WinForm with the default icon and three buttons to minimize, maximize and close the application respectively. Please note that unlike AWT/Swing applications in Java you don't need to handle the default minimize, maximize and close events the .NET Runtime does that for you!! But if you want then you write your own Event Handlers, that's called flexibility!!
Console Application
A console application is a computer program designed to be used via a text-only computer interface, such as a text terminal, the command line interface of some operating systems (Unix, DOS, etc.) or the text-based interface included with most Graphical User Interface (GUI) operating systems, such as the Win32 console in Microsoft Windows, the Terminal in Mac OS X, and xterm in Unix. A user typically interacts with a console application using only a keyboard and display screen, as opposed to GUI applications, which normally require the use of a mouse or other pointing device. Many console applications such as command line interpreters are command line tools, but numerous text-based user interface (TUI) programs also exist.
How To Create a Console Application in c#?
To create a C# console application(In visual studios)
- On the File menu, click New Project.
The New Project dialog box appears. This dialog box lists the different default application types that Visual C# Express Edition can create.
- Select Console Application as your project type and change the name of your application to List Files.
The default location should be fine, but you can always enter a new path if you want.
- Click OK.
Visual C# Express Edition creates a new folder for your project named after the project title. It also opens the main Visual C# Express Edition window and the Code pane where you will enter and modify the C# source code that creates your application.
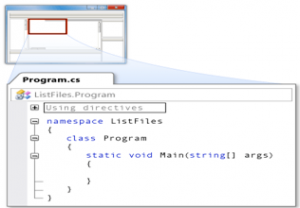
- Make sure that Solution Explorer is visible by clicking the Solution Explorer tab on the right of the screen, or the Solution Explorer icon in the toolbar.
Solution Explorer is a very useful pane as it displays the various files that make up your project. The most important file in this project is the file "Program.cs," which contains the source code for your application.
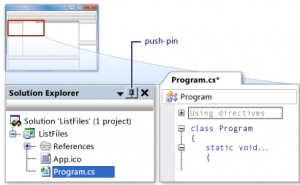
Knowing how to open and hide windows like Solution Explorer is important if you want to keep your Visual C# Express Edition display nice and tidy. By default, Solution Explorer is visible. If you want to hide Solution Explorer, click the Auto Hide icon, the push-pin icon in its title bar, or open the Options menu on the title bar of Solution Explorer and enable Auto Hide. Other windows, such as Class View and Properties, also have these icons.
Example of a console application
// namespaces same as header files in c,c++
using System;
using System.Collections.Generic;
using System.Linq;
using System.Text;
namespace DemoApplication //namespace for application environment
{
class Program { //declaration of a class
static void Main(string[] args) //static main function for running the
// application. application execution starts from the main function
{
Console.WriteLine("HELLO CPD STUDENT");
}
}
}
- Run your program.
Your first program is now complete and ready to compile and run. To do this, either press F5 or click on the Start icon in the toolbar.
- Once the program compiles and runs, the Console window opens
Above code will Generate this output:

Press ENTER to exit the program.
Web Sites(Web Application)
ASP.NET provides a unified Web development model that includes the services necessary for you to build enterprise-class Web applications. ASP.NET is part of the .NET Framework and enables you to take full advantage of the features of the common language runtime (CLR), such as type safety, inheritance, language interoperability, and versioning.
When you use Visual Studio to create ASP.NET Web sites, you are actually using a part of the integrated development environment (IDE) called Visual Web Developer. Visual Web Developer is distinct from Visual C#; it has its own designer to create user interfaces on Web pages and other tools for Web development and Web site administration. But when you create code-behind pages in C# for your Web controls, you are using the C# code editor, and all the features of the editor are available to you in Visual Web Developer just as they are in Visual C#
We will learn more about website development in details in our Asp.net Development Post In more details
How to create web application project in asp.net and c#?
Creating the Web Application Project
To create the Web Form
- On the File menu, click New, and then click Project.
The New Project dialog box appears.
- In the Project Type panel, click Visual C# Projects, and in the Templates panel, select ASP.NET Web Application.
- Name your application MyWebForm by changing the default name in the Location box (such as http://localhost/WebApplication1 to http://localhost/MyWebForm.
- Click OK.
- The application wizard will create the necessary project files, including the following files:
- WebForm1.aspx – Contains the visual representation of the Web Form.
- WebForm1.aspx.cs – The code-behind file that contains the code for event handling and other programmatic tasks. To see this file in Solution Explorer, click the Show All Files icon, and then expand the WebForm1.aspx node.
Web Form Files

A simple web application in asp.net and c#

<%@ Page Language="C#" AutoEventWireup="true" CodeFile="Default.aspx.cs" Inherits="_Default" %>
<!DOCTYPE html PUBLIC "-//W3C//DTD XHTML 1.0 Transitional//EN" "http://www.w3.org/TR/xhtml1/DTD/xhtml1-transitional.dtd">
<html xmlns="http://www.w3.org/1999/xhtml">
<head runat="server">
<title></title>
</head>
<body>
<form id="form1" runat="server">
<div>
<asp:label ID="lblprint" runat="server" Font-Bold="true" Font-Size="X-Large"></asp:label>
</div>
</form>
</body>
</html>
Code on c# page
using System;
using System.Collections.Generic;
using System.Linq;
using System.Web;
using System.Web.UI;
using System.Web.UI.WebControls;
public partial class _Default : System.Web.UI.Page
{
protected void Page_Load(object sender, EventArgs e)
{
lblprint.Text = "HELLO CPD STUDENT";
}
}


